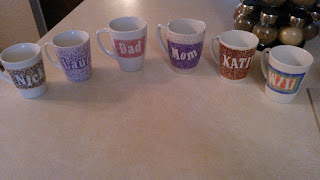
Today's activity was super fun, but did take a lot of time, so if you want to try this one out (which I highly suggest you do!), you should set aside a few hours.
All you need are plain white mugs (dollar store mugs work BEST, because of the glaze over them.) I got 4 small mugs for the kids and 2 bigger ones for my husband and me, some sharpie pens, letter stickers, and rubbing alcohol.
I first washed each cup, and then wiped each cup down with rubbing alcohol, to completely remove any oils that might still be left on the cup. Make sure when your kids do this project, that they aren't touching the front of their cup (where we will focus on with the sharpies), just to make sure the oils from their hands don't come between the cup and the sharpie.
I put every one's name on their cup, using the letter stickers, and then showed them how to do small polka dots all over the front of their cup, concentrating around the stickers. To my oldest kids, this was fun. They like to do little things like this that take concentration, so they did their entire cup on their own. My two youngest however, liked it for a couple minutes. William decided to have a fit, and shortly after fell asleep for his nap, so I had my husband do William's cup, which turned out SO adorable!!
Yep, that's my sweet son, in all his 2 year old tantrum glory. Hey, when your mom is a blogger, you better be ready for a picture to be taken at any moment. ;)
Katie did some polka dots on hers, and then got bored, so I had her pick the colors she wanted, and I finished it for her.
My husband worked on his, and I worked on mine.....it was a fun family project!
Yea.....I had a horrible headache and no makeup on today.....don't judge me!! ;)
Now, if you accidentally slip and draw on the cup, where you didn't want to, all you need to do it get a Q-tip, dip it in rubbing alcohol, and simply wipe off the mark.
We got all of the cups finished, and then it was time to pop them in the oven.
Here is where some people have an issue with this project.
I read for a long time last night about what temp to preheat your oven to, how long to put the cups in the oven for, and so on......so here is exactly what I did, and it worked perfectly for me!
-First, make sure your cups are cheapy cups from the dollar store. They seriously work best!
-Wipe down all cups with rubbing alcohol and then rinse, and dry before starting.
-When you are finished decorating your cups (and you remove the stickers), put them on a baking sheet, and put them into your oven. NOW preheat your oven to 425.
-Once the oven has preheated, set your timer to 30 minutes.
-Check on them ever 10 min or so just to make sure the cups don't turn brown. Mine never did.
-When the timer goes off, turn OFF the oven and LEAVE YOUR CUPS INSIDE THE OVEN!!
-Let your oven completely cool before removing the cups. This took my oven over an hour, so be patient!! This prevents the cups from cracking.
Now you can use your cup, and wash it without the sharpie coming off!
You will notice that some of the colors you chose, turned into different colors or faded a bit. We had some of that happen, but it ended up PERFECT!
Here are pics of each cup before they went into the oven, and after....
Williams cup before the oven....
William's cup after the oven....
Katie's cup after the oven....
Laura's cup before the oven.....
Laura's cup after the oven....
Nicholas's cup before the oven...
Nicholas's cup after the oven...
My cup before the oven....
My cup after the oven....
Nick's cup before the oven....
Nick's cup after the oven....
There ya have it!! You can see that some colors CHANGED, and some faded.....but all in all they turned out awesome! It was fun to see the end results, and now we are all excited to use them with tea, hot chocolate (or chocolate milk now that its summer) and of course, mama's coffee!!
My imagination has been going crazy with ideas, to draw or write on these cups, and to try out plates, to give as gifts!!
I really hope you all give this one a try!! :)
<3


No comments:
Post a Comment